- Case
- Solution
- Step 1 - Audit the HyperV virtual machines
- Step 2 - Export the HyperV virtual machines
- Step 3 - Create the target Proxmox virtual machines
- Step 4 - Import the virtual machine disks
- Step 5 - Configure Proxmox virtual machine boot
- Step 6 - Start and validate the Proxmox VMs
- Step 7 - Decommission the old source HyperV virtual machines
- References
Case #
You have a Hyper-V virtualization cluster and need to migrate all virtual machines (VM) to a new ProxMox cluster. This KB post provides step-by-step guidance on how to migrate HyperV virtual machines to Proxmox. However, given that Proxmox is a KVM-based hypervisor, you can follow along the guidance in this article for any other KVM-based hypervisor used as target in your VM migration. Please note that this guide assumes a fully functional Proxmox cluster running version 8.1.4. If you have an earlier version, it is possible that not all steps may be valid or that you come across any errors during the process. If this happens, make sure that you review the official Proxmox documentation and Proxmox forums.
Solution #
Follow the steps below to perform the HyperV to Proxmox VM migration. For details on how to deploy a Proxmox hypervisor cluster, refer to the official documentation at:
Step 1 - Audit the HyperV virtual machines #
Create a list of your HyperV source virtual machines. You can quickly get a list of all your HyperV VMs by running the following Powershell Windows Failover cluster module cmdlet:
Get-ClusterResource | Where-Object {$_.ResourceType -eq "Virtual Machine"} | Select Name

You can also utilize the Powershell HyperV module in combination with the Windows Failover Cluster module, to receive all hardware settings of each virtual machine, which will need to be documented afterwards. You must document the following VM information. After the HyperV disks have been exported and imported into the new target Proxmox VMs, you will need to re-configure the NIC(s) of each new virtual machine.
- VM name
- OS hostname
- IP addressing info
- VLAN ID
- List of OS disk and data disks
- RAM/CPU hardware configuration
Then create an Excel spreadsheet where you provide the migration status of all virtual machines, such as in the following example table.

Also take into account how your Windows virtual machines have been licensed. If you are using Windows Server datacenter edition in all source HyperV hosts and use AVMA for Windows Server VM licensing, then you should consider the total number of physical host CPU cores licensed. In the target Proxmox cluster state, you must be utilizing the same number of total physical CPU cores as in the source HyperV cluster state. If you are using Windows Server standard licenses for the individual VMs (per VM vcore licensing or flexible virtualization licensing or similar licensing scheme), then no further considerations need to be made, as the licenses will be re-used as is.
Also before proceeding, ensure that you have installed the Virtio drivers for Windows operating systems and the QEMU guest agents on all source virtual machines. These are included in the same bundle which can be downloaded from https://pve.proxmox.com/wiki/Windows_VirtIO_Drivers. After installing both the .msi installer and the individual qemu guest agent installer (found in the respective folder of the virtio win bundle), you should be ready to shutdown the virtual machine(s). Optionally, you can also install the SPICE agent on the VM from the same bundle, in order to utilize the Spice remote connection protocol inside Proxmox.

After shutting down each virtual machine, it is crucial to check whether there are any VM snapshots created for any given VM. If this is the case, you will need to delete and merge any existing snapshots, so that eventually each source VM comprises a single .vhdx file, without any .avhdx differencing disk files. To merge any existing snapshots, follow the KB article on how to merge HyperV checkpoints (snapshots).

Step 2 - Export the HyperV virtual machines #
You are now ready to start the exports of the HyperV virtual machines into a network share, NAS/SAN appliance or other type of storage, e.g. SSD external disk. In either case, it is crucial to choose a stable physical machine with high memory/CPU/IOPS, to ensure high performance during export operations.
To export the source HyperV virtual machines, use the HyperV Manager console on each HyperV host. Ensure that you export each VM from the HyperV Manager console on the HyperV host where the respectibe VM is hosted, otherwise you may come across permissions issues during the VM export. You can utilize the HyperV powershell module or user the HyperV manager MMC console to accomplish the exports. Your export target location should be an SMB (CIFS) UNC share, on which all HyperV host AD computer objects must have full NTFS and SMB share permissions.

Step 3 - Create the target Proxmox virtual machines #
You now need to pre-create all Proxmox target virtual machines with same VM names as the source VMs. Use the proxmox bash on any proxmox host or the Proxmox HTTP portal to create the VMs. It is assumed that you have a fully configured and operational Proxmox cluster, utilizing one or more SAN LUNs for its VM disk storage.
In the Proxmox HTTP portal new VM creation wizard, carry out the steps below.
- On the desired Proxmox node, right click and choose "Create VM". Bear in mind that any VM can be migrated to any other Proxmox node later on. Same stands for any disk created inside the VM, as you can change owner of the disk to any other virtual machine in the proxmox cluster.
- On he General tab, provide the VM name and leave all other defaults, including the VM ID. Keep note of this ID, as it will be used in other commands later in this guide.

- On the OS tab, click "do not use any media" and choose the guest OS of your choice.

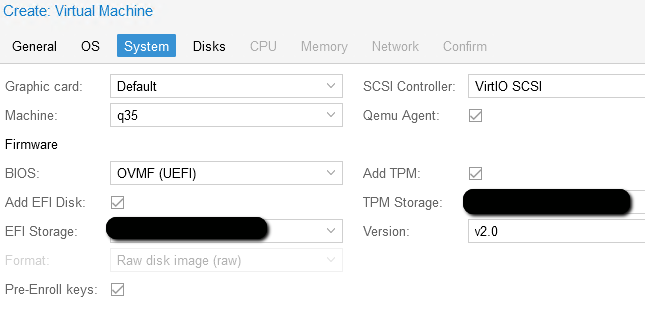
- On the System tab, choose the "q35" machine type and OVMF (UEFI) BUIS type with "Add EFI disk" checked. Also choose the "Virtio SCSI" SCSI controller and enable the QEMU agent. Depending on your chosen guest OS, you may need to also add TPM storage.

- On the Disks tab, delete the pre-populated disk and click Next.

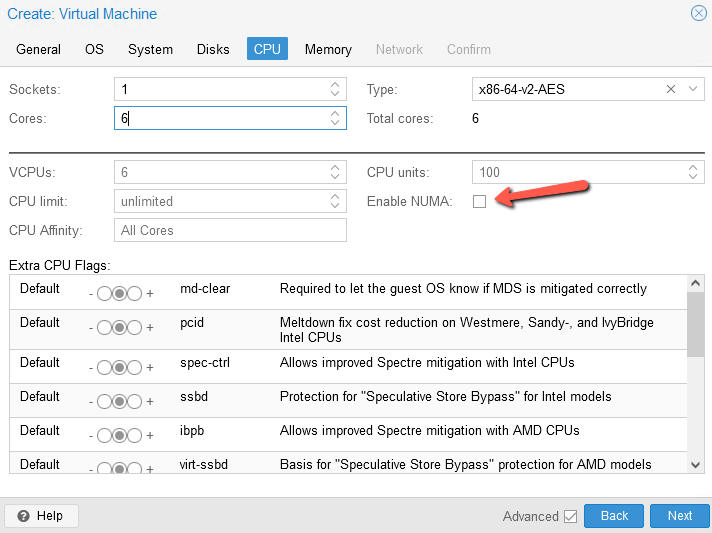
- On the CPU tab, provide the number of sockets and cores and only enable the "NUMA" mode if the total number of VM vCPU cores exceeds the total number of physical cores available in a single physical host socket.

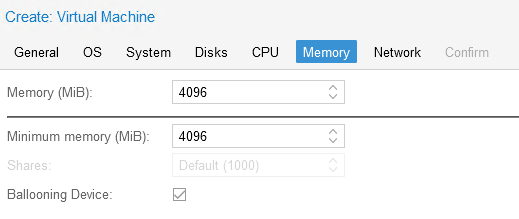
- On the Memory tab, choose your desired RAM and if you will be having dynamic memory (ballooning device) or not.

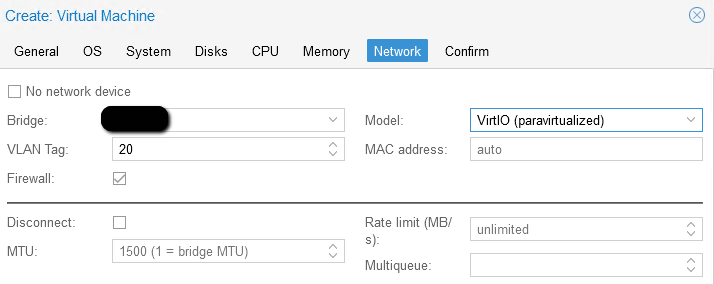
- On the Network tab, choose your bridge device and choose the Virtio (paravirtualized) model as well as your VM VLAN membership. Ensure that the VM MTU setting matches that of the Proxmox host(s).

- On the Confirm tab, review all VM parameters and click Finish.
- After the VM is created, edit it in the hardware section and add one IDE CD/DVD to attach the Windows operating system iso and another IDE CD/DVD for the virtio-win.iso
- So in the end, you should have the following hardware configuration in all your Proxmox target virtual machines. In this example, the red arrow points to two disks, one of which is the OS disk and the other is a data disk.
Step 4 - Import the virtual machine disks #
Before importing any virtual machine disk into a Proxmox VM, you can optionally convert the .vhdx disks into the .qcow2 format. However, since this conversion takes a very long time, it is recommended to directly import the exported .vhdx file of each VM into Proxmox. This will create a raw disk which will then be attached into the Virtio SCSI controller of each VM. If you choose to convert from vhdx to qcow2, the following command must be used:
# Convert vhdx to qcow2
qemu-img convert -O qcow2 "/home/vm/[path].vhdx" "/home/vm/[path].qcow2"
Firstly, run the following command on all target Proxmox physical nodes to mount the CIFS (SMB) share where the exported disks are stored. You can alternatively use an NFS share if needed.
mkdir /home/vm
mount -t cifs -o username=<user>,domain=<domain name> //hyper-v-host/share /home/vm
Now check the source image's health by running following command:
#Check image health
qemu-img check -r all "/home/vm/[path].vhdx"
You can now import the source HyperV virtual machines from the export CIFS share location into a target Proxmox virtual machine by using the following command.
#Import disk to proxmox
qm disk import [VM_ID_NUMBER] "/home/vm/[path].vhdx" [STORAGE LUN NAME]
[STORAGE-LUN-NAME] parameter can be local-lvm or any other SAN-based LUN name which is mounted to the Proxmox host(s).
If you come across this error (https://forum.proxmox.com/threads/cant-import-disks-into-proxmox-dreaded-volume-deactivation-failed.140267/), ensure that there is no MTU mismatch between your Proxmox hosts and the SAN system where the storage LUNs are hosted. Fix any MTU mismatches to resolve this error.
After the disk import succeeds in the CLI, you should run the following commands to make the Proxmox hosts aware of the disk import.
#Rescan and list disks
qm rescan
qm disk rescan
pvesm list [STORAGE LUN NAME]
Step 5 - Configure Proxmox virtual machine boot #
If the target VM is a Linux VM, you should normally not need to run a custom boot order at fist boot, since the virtio drivers should already be installed in the Linux VM, e.g. Ubuntu LTS 22.04 server.The below custom boot order configuration is required only for Windows virtual machines.
Each Proxmox Windows VM should have the following boot order setup during first boot.

After the initial boot, the boot order should be edited again to have the OS disk (C disk in Windows) as the boot disk and remove the two .iso from the respective CD/DVD devices.
The reason for the first boot is to load the WinPE Windows environment from the Windows iso and run CMD in troubleshooting mode, to ensure that the Windows virtio scsi driver is loaded for the SCSI controller hosting the Windows virtual machine. Then the Windows OS disk shall be mounted to the virtual machine and the subsequent boot will be from that OS disk. When you have loaded the WinPE environment, choose the Windows version, then click "Restore my computer" on the bottom left and choose option to Troubleshoot and then start the Command Line. Run the following commands in the command line from the VM Proxmox console.
#Run below command to check which drive includes the virtio iso, e.g. E: in this case.
wmic logicaldisk get deviceid, volumename, description
#Load the SCSI driver for Windows
drvload e:\vioscsi\2k19\amd64\vioscsi.inf
#Rerun to confirm presence of OS disk
wmic logicaldisk get deviceid, volumename, description
#Mount the OS image (disk)
dism /image:c:\ /add-driver /driver:e:\vioscsi\2k19\amd64\vioscsi.inf
#Reboot
exit
Remember to fix the VM boot order to remove the CD/DVD isos and only keep the OS disk as boot disk.
Step 6 - Start and validate the Proxmox VMs #
Carry out the following tasks. You should keep the source HyperV VMs shut down at all cases. Only the Proxmox VMs should be active now.
- Start the VM. Check in the Windows Device Manager Disks section and Networking section that the Virtio and QEMU device driveres are recognized. This should be the case if the virtio Windows bundle and the QEMU agents have been installed on all Windows VMs.
- You should expect the IP configuration to have been reset in the new Proxmox VM. So you will need to revert the correct IP addressing configuration and mounted disks (data disks) and verify network connectivity and AD domain join state. The OS machine SID and the Active Directory computer object SID of each VM should remain identical as the disk has not been altered in any way. You will only get a prompt after setting the IP/Mask/Default Gateway/DNS information, that there is the same IP config in another NIC on this VM and you should confirm its automatic removal from the OS.
- Restart the VM to boot from the OS disk again and make sure everything is working. Verify operations of Active Directory, file, SQL, application servers, backup, Internet connectivity and remaining servers.
Step 7 - Decommission the old source HyperV virtual machines #
After you have confirmed operations of all the target Proxmox virtual machines, you can go ahead and remove the HyperV virtual machines from the HyperV cluster and from HyperV manager, along with their original .vhdx files.
References #
- https://forum.proxmox.com/threads/how-to-convert-windows-10-generation-2-hyper-v-vm-to-a-proxmox-vm.107511/
- https://forum.proxmox.com/threads/migrating-hyper-v-to-proxmox-what-i-learned.137664/
- https://www.vinchin.com/vm-migration/hyper-v-to-proxmox.html
- https://www.vinchin.com/vm-backup/import-qcow2-proxmox.html
- https://pve.proxmox.com/wiki/OVMF/UEFI_Boot_Entries


